Hi everyone, thanks for visiting my blog! You can purchase my work on Etsy, Ebay, or from my website. All images and designs on this blog are copyright by their creators. Be respectful, don't steal.

Tuesday, December 21, 2010

Not done yet...

Hi everyone! I'm still working hard at my new job, they have lots of vacant shifts due to holiday vacations and openings and I have been working day and night! This has left little time for my minis, and even just for being in contact with everyone.

First things first, Merry Christmas to all my friends and followers! It's coming fast and I might not be able to post anything new before it comes.

Second, sorry to everyone that I have been ignoring!
Susan, sorry for the delay in finally getting your steampunk set to you, hope it arrived in one piece.
Nikki, I got your package ages and ages ago, THANK YOU SO MUCH! I've been meaning to do a whole post on it but haven't had time.
Ewa, oh my gosh thanks so much for the Christmas present! I couldn't wait and opened it early of course! I'll do a post on it later on. Thank you!
And I'm sure I owe words to many others, thanks for being patient with me!

Okay, now I need some help with my steampunk dilemma. While I was building the other 5 sets, I noticed the first set was loosing it's light quickly. I found out that the bulbs were needing too much power and my tiny batteries couldn't provide it long enough. So, in talking to Susan about what could be done, we came up with a base that held a bigger battery (one of those 3v lithium coin cell batteries) and a switch. We also swapped out the bulb for an LED bulb. I wished I could have made the base much smaller, but I think Susan is happy with it :). It's the one in the pictures below:


So my dilemma... I have 5 original sets pretty much done. I have to make the tiny pressure gauges and then just permanently secure the bulbs (they're just being held with putty at the moment). It's been so frustrating with the lighting not working the way I wanted, I really wanted everything to be hidden in the original wand box and not have to have extras, but I can't have everything I want! :)  So I wanted to see what you guys thought about these two options:

The set goes for $39.00 and it comes with the box and the wand. Should I cut $10.00 off the price and sell it without it being able to light up?
or
Should I build the base like I did for the one pictured above?

Here is what they look like so far: (click on the picture to see it bigger)


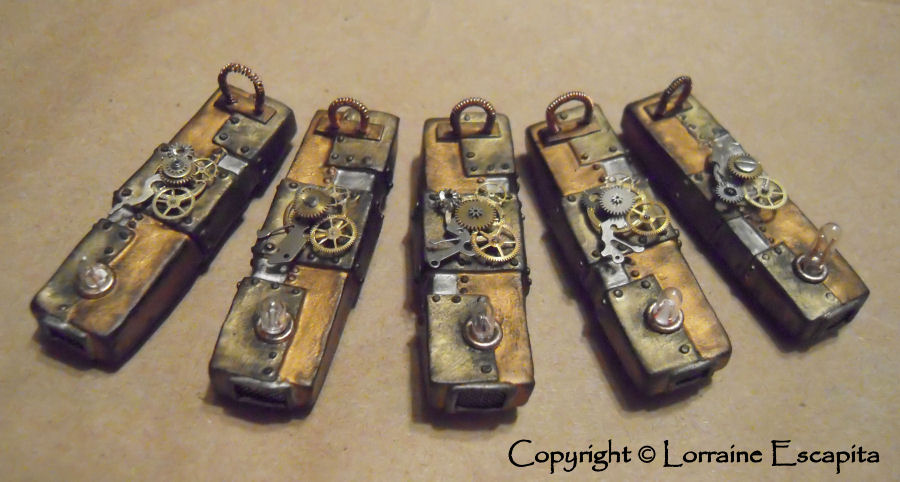
They still need the pressure gauges and the bulbs are being held in place with putty at the moment, but they are very close to finished.

So, tell me what you think and we shall see where it all goes :)

Thanks for your help!

Wednesday, November 17, 2010

Celebration!!!

Remember the big stuff that was happening that was making me all stressed at home but I kept saying it was a good thing? Well it has reached its peak!

I used to work for a great company for 10 years, then went bonkers and quit because I had health issues. Well I really just should have kept working through my health issues and sought help and learned to cope... really, the grass is not greener on the other side! I've spent over a year in crappy jobs and scraping by financially and worrying every second.

Recently, I've been trying to get back into the same industry because other jobs just weren't cutting it and minis aren't paying all the bills. Finally, while interviewing a few times at a shiny new company they asked me to contact my old employer to get some references. It was looking extremely promising!!! I had a feeling they were really going to hire me! So, I contacted my old employer (the place I gave 10 years to) and they did what they could in regards to references. But.... they called the next day and asked me in for an interview there! OMG!!! I was so excited! The interview went great and I had a strong feeling I was going to be asked back. The next day, the shiny new company calls and offers me a job. It's the exact same job that I interviewed for with my old employer... now what was I to do! After a really long night I decided to hold out for my old company so I told the new guys, thanks but no-thanks. It was the hardest thing I've done since quitting. How could I turn down a job I've been searching for and worked so hard to try and obtain again!

Luckily, a few days later my old employer called to offer me a job! So I have a really great job again! With great money, and great people that I know and love and have missed for so long! So I've been running around and doing paperwork and making arrangements... whew! I'm tired and I haven't even started yet! :)  Busy, busy, busy!

So, what does this mean to my mini world? Only that I'll have more money for supplies!!!! Yaaayyyy!  I was doing this job when I first started making minis, so I really don't think it will be a hindrance, although I may slow down a little at first.

Okay, so, packages have been sent for everyone that ordered stuff around the skull wand time, I've shipped some on Monday and some today, sorry for the delay but I threw in extras for everyone. I'm still working on the steampunk stuff and hope to have it out around the weekend. I think 3 of the 5 sets I am making are spoken for, plus the preview set is also spoken for. That means I have 2 sets that will be listed on Etsy and hopefully some loose wands too.

Oh, and to celebrate my new job and old life returning,
I am taking 30% off all books in my Etsy shop.
I'll head over right now and start reducing prices.

Monday, November 15, 2010

Skull Wand Stands

I've been a little slow with emails over the weekend, sorry about that! The weekend just slowed me down to a halt :). I'll get back to those of you who are waiting today.

Here are the skull wand stands I had talked about before.

This one is my favorite, I'll be listing these on Etsy when I'm done blogging.

Here's a little bit of a top view. 

And here's a view for size reference. 

This one is the first one I made , remember I said I wasn't happy with it.

I think the bones that hold up the wand are too tall.

And it feels like it's missing something. 

Maybe a rose, or a spider. Anyway, I'll list this one for less since I feel like it's missing something. 

I also painted the rest of the skull wands I had. I'll be listing these on Etsy as well. Wand 'J' is all crooked though, so he will also be on sale.

I have enough stuff to make 5 steampunk wand & box sets, I'll start working on those this week. I think I have enough stuff to make more wands after that (without the boxes), I'll have to check though.

I also have an idea for an industrial wand, kind of like the steampunk style but more steel and nuts and bolts. We'll see how far I get on that! :)

Wednesday, November 10, 2010

Steampunk Wand - Preview

Okay everyone, here is a preview of my new Steampunk Wand and matching box. The box still needs work but I am very happy with the wand.
That is a working light bulb on the box. It only lights up when the box halves are together.

Here is a slightly different view, it's hard trying to get all the details to look just right in the pictures. 

The inside of the box is lined with leather.

Leather and steampunk, perfect match :). 

Okay, for the details on the wand... There is a copper coil all down the wand, imagine it's the conductor of the electricity or power for the magic. In the hilt of the wand we have a pressure gauge. You know how machinery can be tricky, better keep an eye on it! If your magic starts to get away from you and overload, use the handbrake :). 

I incorporated some gears and watch parts in the hilt too. 

The box, I like to imagine it is the charging station for the wand. I put in another copper coil and pressure gauge. Some watch parts for that popular steampunk look, and a working glass light bulb.
I tried to make the box look like it was made from scrap metals. It's actually all clay and painted in various golds, coppers, brass, and silver.


So why don't I like the box 100% yet? I want the edges to be sharper and one end is narrower that the other because I held it there too tightly before I baked it. Can't really see that until you look for it, but I know it's there :).

Okay, I really need to paint those skull wands and list them. I'll list them on Etsy tomorrow around 11am or 12 noon my time (US Pacific time). According to the little gadget on my blog, I think that is 6pm or 7pm UK time. I'll only be listing 4 wands and 4 wands + boxes. Each little skull turned out different so I'll take pictures of each so you can pick your favorite.

I'll be making 4 skull wand stands, but I'll need some design help so I'll do a blog post either later or tomorrow on them.

Tuesday, November 9, 2010

What happened?

Life happened. I had some major stuff going on at the end of last week, then I was moving slower than a snail over the weekend, and that major stuff leaked into this week. It's good business stuff, but stressful. I'll let you know more if it all turns out the way I hope.

So where is the skull wand stand? Right where I left it... a little more along, but not much. I made one skull stand but it didn't turn out like I hoped, I think I'll still finish it up and list it at a reduced cost (it still looks good but it feels like it's missing something). I did however make some really cool skulls, bones, and a jaw last night for the next stand. Just haven't figured out the placement... maybe I'll illicit some help from everyone. I'll just paint it up so it shows better (I used black clay again) and then snap some pictures of everything so you all can help me figure it out.

And the steampunk wand and box? The wand has been finished for a while now, and I finished part of the box. I worked out the electronics... yes, the box lights up! I'm just waiting for the right light bulbs to come in the mail. I have 12v but I need 1.5v or 3v for it to be battery operated. I think I'm going to demo it with the 12v bulb and some carefully concealed wires leading from the side or bottom to a power source. I did figure out that the difference between battery operated and plug-in is just switching between 2 designs in the lower box, pretty easy since the top box has all the sculpting and cool components. I've rigged it so that it only lights up when the two box halves are together, when the box is open the circuit is broken and the bulb turns off. I thought it was a cool way to portray a sort of recharging station for the wand. Also, with the placement of a small, almost invisible, piece of plastic, the circuit can be broken while the two box halves are engaged so as to preserve the bulb and battery life when you want it closed but not necessarily lit up. Pretty cool! It may sound confusing, but once you see it you'll understand :).

Okay, need to get back to that stressful bit of life for today so you won't hear anything from me for a day or two. Except emails, I've been able to somewhat keep up on those. And an occasional comment on a blog :).

Wednesday, November 3, 2010

Skull Wand

My commissioned orders are almost all complete for now, so I will be spending the holiday season bringing out the new wand designs that I have been promising. I will try to continue to list them in 3 ways (wand & stand, wand & box, and just wand) so that I keep an affordable range of prices available to you. If you miss out on a wand you like, let me know and I can make it again for you.

I have put together a quick Wand Price Guide for everyone, take a look at it for prices, wand varieties, and more.

Okay, now for a new wand....
I have been dying to put this design out for a while, (since I did the Pumpkin Wand actually). It is my new Skull Wand.
My daughter helped design this box, I think it's perfectly creepy!

And inside.... laying on a bed of black velvet.... almost like a coffin J.... is the matching wand. 

The wand and box have very simple colors, an off-white with black accents and shadings. 

The skull is not as detailed as some of my others, but this guy is just so tiny! 

Can I say that this wand is my favorite when I say that about each one? J
The wand measures about 1 1/4" long, the box is about 1 1/2" long and 3/8" wide. I have a stand designed already too, I just haven't made it yet. It will have bones and skulls and be creepy J. This wand almost made me want to do a Voldemort wand... maybe in the future...

I am going to try and get the stand finished today so I can list it in Etsy by Friday. My Steampunk wand is also finished, I'm just finishing up the box so I'll show that one here on the blog next and hopefully list it on Etsy at the same time as the Skull wand. I'll do another post when I'm ready for Etsy.

More Sharing...

Some more sharing!
I received some great stuff from Glenda over at Peppercorn Minis a while back, and it's well overdue for some blogging attention J.

Here are some of the minis that I received (there was a whole lot more in the package than just minis!). My ever so generous friend Glenda sent over not only items that I had ordered, but also included wonderful gifts!

First is this gorgeous mushroom themed rug.
I can't even begin to tell you how soft it is! If it was life-sized, I could curl up on it and fall asleep J. There are many rugs in Glenda's Etsy Shop, I highly recommend checking them out!

Then there is this perfect little bottle. Just look at the netting! And can you see that tiny feather? Just perfect! 
I distinctly remember someone buying these up like crazy, now I know why! These are also available in Glenda's Etsy Shop.

Then there are these beautiful baskets. My favorite Halloween colors! I want to fill these with Halloween candies and treats, as soon as I get a free minute J
I remember loving these when I first saw them, now I am so lucky to have 2! Thanks Glenda!!!

 Oh and look at this tiny medieval pouch! I'm telling you, Glenda has got magical fingers!
I think I would have gone crazy trying to keep that perfect bunching while still making it look so good.

Ooooo, and look at all the feathers Glenda sent! So many great patterns and colors and sizes!
Glenda recently did a blog post about trimming feathers, I will definitely be spending some time on that!

And just what a girl always wanted... thin leather!!! I can think of so many uses for these!
First things first, some wand sheaths/scabbards. Maybe I can use some for the interior of my steampunk wandbox... we'll see J.

My husband confiscated all the non-mini treasures that Glenda included for himself so I can't show you pictures of those, but I can show you what is on it's way back to lovely New Zealand....

Among other things that I'm not showing because I don't want to ruin the surprise, are some of my more popular minis and some new items.

Some drippy wax candles.
I accidentally took this picture before I blackened the candle tips, so just imagine that part done J.

Then some of my rustic wands. 

And some of the dragon scrolls that I have been making.  
From left to right: Dragon Classifications, Dragon Anatomy, and just plain old Dragons.

Now these little critters were so fiddly to work on. Barn Owl eggs. They are supposed to be just around 1/8" tall, I think mine went a smidgen over. I think I got the bone color right though. 

Last but not least... Mistletoe sprigs.  I hope these are what you wanted Glenda J.
I was really happy with how they turned out in the end, they went through quite a transformation in their assembly process. These are clay, I haven't tried making paper plants or flowers yet.

Well that's it, the rest is a surprise and you'll have to keep an eye on Glenda's blog to see what it is J.

I'll be doing some posts on some of my new wand designs in a few hours (it's still midday here), so keep your eyes peeled J!

Wednesday, October 27, 2010

Wands and Scrolls for Etsy...

Just wanted to let everyone know that I have wands and scrolls in my Etsy store. They are the same designs as before, I just re-made a few of each while working on other orders. (Glenda, still working on your order... but you'll be happy when you get it I promise!)

Also, I have designed a new steampunk wand and box (still working on a stand design for this one), and I will be showcasing it here on my blog in a few days. I'm so excited, I love steampunk and this will be my first steampunk mini. It's totally an original design too, so I can't wait to build it and show everyone!

And one more thing, to all my new and old followers... I have tried getting totally caught up with you guys and I have been signing up to follow all your blogs (aren't you proud of me :)). There may be a few that I have missed and I know there are a few who's blogs I couldn't find. Leave me your blog address in the comments of this post and I will promptly go sign up :).

Tuesday, October 26, 2010

Giveaway at Bearcabinminiatures!

Julia over at Bearcabinminiatures just reached 250 followers and is having a fabulous giveaway of this hand stitched sampler, framed in a pine wood frame.
Julia will be running a series of Halloweeny posts showing bits and pieces that she makes this week for a mini Halloween party on Sunday... and it is rumoured that the winner may get more than the just the sampler!
(As if that wasn't enough Julia!)

THE GIVEAWAY ENTRY RULES
1. You must be a follower of Bearcabinminiatures, new followers welcome!
(If Julia reaches 275 followers between now and midnight Saturday, she will do 2 giveaways and we will have double the chance to win something, so get over there!)
 
2. You must leave a comment on her giveaway post or any or all of her Halloween Posts, they will be labelled Halloween Post 1, 2,3,4.
(If you leave a comment on all posts, then your name will go in the pot each time.)

3. You must put a link on one of your blog posts to Julia's blog.
 
The giveaway is open worldwide and will run until midnight (UK) Saturday 30th October. And the winner will be announced in the Gerties Little Industrious Cottage ~ Halloween Party post on Sunday 31st October.

Julia, thanks so much for giving us all a chance to win some of your stuff!

Friday, October 22, 2010

Display Case Tutorial Part 5

Last part... we are finally done! I think this was somewhere between 8-12 hours. Not really sure though.

Here it is....


For the trim I added to the top, I used the same technique as for the decorative disk at the bottom, only with rolled out snakes instead of a ball. That hid my glue mishap well! I kept it a solid brown oxide to match the other trims and places that I did that.

I cut a piece of red velvet for the inside. I think it really makes it pop!

Here's a front view.

Side view.

Back view.
I forgot to say earlier that when I was painting, I dry brushed some black and brown on the hinges so they wouldn't look so new.

Then I decided to play dress up J.


Well, what do you think? I think it turned out okay by the end. I hope everyone enjoyed following along, hope I didn't get you too lost!

Morgan, this will be on it's way to you Monday or Tuesday J.