Wednesday, October 27, 2010

Wands and Scrolls for Etsy...

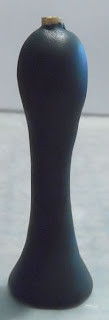
Just wanted to let everyone know that I have wands and scrolls in my Etsy store. They are the same designs as before, I just re-made a few of each while working on other orders. (Glenda, still working on your order... but you'll be happy when you get it I promise!)

Also, I have designed a new steampunk wand and box (still working on a stand design for this one), and I will be showcasing it here on my blog in a few days. I'm so excited, I love steampunk and this will be my first steampunk mini. It's totally an original design too, so I can't wait to build it and show everyone!

And one more thing, to all my new and old followers... I have tried getting totally caught up with you guys and I have been signing up to follow all your blogs (aren't you proud of me :)). There may be a few that I have missed and I know there are a few who's blogs I couldn't find. Leave me your blog address in the comments of this post and I will promptly go sign up :).

Tuesday, October 26, 2010

Giveaway at Bearcabinminiatures!

Julia over at Bearcabinminiatures just reached 250 followers and is having a fabulous giveaway of this hand stitched sampler, framed in a pine wood frame.
Julia will be running a series of Halloweeny posts showing bits and pieces that she makes this week for a mini Halloween party on Sunday... and it is rumoured that the winner may get more than the just the sampler!
(As if that wasn't enough Julia!)

THE GIVEAWAY ENTRY RULES
1. You must be a follower of Bearcabinminiatures, new followers welcome!
(If Julia reaches 275 followers between now and midnight Saturday, she will do 2 giveaways and we will have double the chance to win something, so get over there!)
 
2. You must leave a comment on her giveaway post or any or all of her Halloween Posts, they will be labelled Halloween Post 1, 2,3,4.
(If you leave a comment on all posts, then your name will go in the pot each time.)

3. You must put a link on one of your blog posts to Julia's blog.
 
The giveaway is open worldwide and will run until midnight (UK) Saturday 30th October. And the winner will be announced in the Gerties Little Industrious Cottage ~ Halloween Party post on Sunday 31st October.

Julia, thanks so much for giving us all a chance to win some of your stuff!

Friday, October 22, 2010

Display Case Tutorial Part 5

Last part... we are finally done! I think this was somewhere between 8-12 hours. Not really sure though.

Here it is....


For the trim I added to the top, I used the same technique as for the decorative disk at the bottom, only with rolled out snakes instead of a ball. That hid my glue mishap well! I kept it a solid brown oxide to match the other trims and places that I did that.

I cut a piece of red velvet for the inside. I think it really makes it pop!

Here's a front view.

Side view.

Back view.
I forgot to say earlier that when I was painting, I dry brushed some black and brown on the hinges so they wouldn't look so new.

Then I decided to play dress up J.


Well, what do you think? I think it turned out okay by the end. I hope everyone enjoyed following along, hope I didn't get you too lost!

Morgan, this will be on it's way to you Monday or Tuesday J.

Display Case Tutorial Part 4

We're on the home stretch now! I assembled the lid and painted everything black. I like my minis to have a dark look to them so I usually start with black or dark brown as a base color.

Can you see where my glue choice fogged the "glass"? I always have that problem, I even tried a different glue this time. I'll have to do something to cover that later.

I also attached the hinges.

I can't believe it, it actually opens! J

I attached the bottom piece. Looking a little better now J.

Sorry, I didn't take pictures of all the painting steps. I was just trying things out and ended up with this.


Using craft acrylics, I laid some antique white over the black (but not into the indents and creases), and then dry brushed on a really light amount of nutmeg brown. Then I dry brushed on several coats of brown oxide (it's a darker brown) to the areas I did not want highlighted by the lighter undercoat. I kept the circle at the bottom solid brown oxide, as well as the small trim right before the decorative disk at the bottom. Also the decorative piece at the top of the pedestal piece (right before the top piece) is solid brown oxide, and the edges of the lid are too.

On to the next post. There are finishing touches to be done!

Display Case Tutorial Part 3

Ready for the top? J

I made myself a template on my computer for the lid piece. That is always the best way for me to get my measurements correct. It's just boxes and rectangles, I just imagined the top in a flattened view and this is what I got. I wrote in the measurements for you.

I then used the template to cut the shapes from wood. The wood is 1/16" thick, nice and thin. I ended up having to cut 1/8" off the bottom of the center piece, it had to do with the way I was putting it together. I didn't account for the 1/16" thickness of the top and bottom pieces in my template and it was making the side pieces seem too short.

Here it is all assembled.

I used my same template to cut the top piece out of the same kind of wood. Also cutting the hole for the "glass".

I then chose my hinges and cut some notches for them to fit snugly against the wood.

Here's my glass J. An old plastic something that I will cut down to size.

Here it is slightly larger than the hole but smaller than the wood piece.

Slippery plastic doesn't like glue, so I'm making a twin to my wood piece out of clay. This will sandwich the "glass" in.

I almost for got about the 1/16" thickness of the walls of the box, so I cut the clay piece smaller than the wood piece and baked it. This way the lid will lay flush to the box when it closes. I'm showing you the pieces layered here so you can see the size, but remember that the "glass" goes between the clay and wood when we are ready to assemble.

Okay, I'm going to go to a new post for the assembly and painting. See you there J!

Display Case Tutorial Part 2

Okay, next part... I made a ball of clay. Small, maybe 3/4" x 3/4".

Then I flattened it with my fingers. Not too much, it's still pretty chunky.

Then I took a needle and made more random indents all around it. These are deeper than the ones before. I had to rock the needle so it would move with the curve of the clay.

Then I flattened it a little more, just a tiny bit though.

Then I centered my previous piece on it.

And pushed it down, further flattening the disk thing and embedding the long piece into the disk.

Then I took my circle stencil thing and found a circle slightly larger than the disk.

And I rolled out some clay in my pasta machine and cut the circle out with my exacto knife.

I then put some TLS on the circle and placed my other piece on top, centered. I used TLS this time since I wouldn't be pushing down a lot to really get the two pieces to stick. If I pushed down to much it would distort the circle.

I added some clay to the top and shaped it with my hands. Then I used my needle and made two decorative lines on the new addition. I lightly wire-brushed the bottom disk thing to add some texture there.

Then I popped the whole thing in the oven.

Bottom piece is done for now. Moving on to another post....

Display Case Tutorial Part 1

Hi everyone! I've not been feeling well so I haven't been checking blogs... but I'm feeling better now so I'll come around and see all the things you guys are up to soon J.

Here is the tutorial I promised. It will be in sections over a few posts. Remember though, I am definitely no expert!!! I muddle along until it looks right and there is always something a little off J.

Okay, I started with a sketch. I'm a horrible sketch artist but you can kind of make out basically what I plan to do.
It's going to be a slanted design for the top piece, with "glass" in it so you can see all the treasures inside. It will need hinges, and I will need a lot of patience... I do not work well with hinges! I found a website or blog or book or something once that showed how to work with mini hinges, can't remember if it helped J. I'll have to try and find it again.
The bottom will be like a pedestal thing, minimally decorated.
I wanted the top to have a latch or lock mechanism in the front, but you will see later that I decided against that. No particular reason, I just didn't add it.

Some of the tools I used.

 A piece of a dowel that I cut down to 2.75 inches, this will be the structural support. My handy dandy clay shaper. I had to wrap it with clear tape a long time ago because the clay on my hands was eating away at it. That was when I first started with clay and was using modeling clay. And then I also used a stylus, covered in paint and old clay J, and some Scupley III - my preferred clay.

Step 1: I covered the dowel in clay.

Then I added more clay to the top and bottom sections and worked out a rough shape with my hands.

Then I took my stylus and made some indents around the top. Just random ones, deeper at the top and less towards the bottom.

I then used my clay shaper to soften the indents and smooth everything up. Then I cut some clay off the top (remember from the sketch, there will be more decoration here). And I used a needle to make a line along the bottom edge for some design.

I used this wire brush thing to give the whole piece vertical lines for texture. It will sort of simulate wood grain and it will give the paint something to do J.

Then I scraped it off my work surface with my blade and popped it in the oven.

Okay, I'm moving on to a new post now for the rest.

Wednesday, October 13, 2010

Sharing time!

This is extremely long overdue! I have lots of things to share from many great artists, and I also have a few of my own things to show.

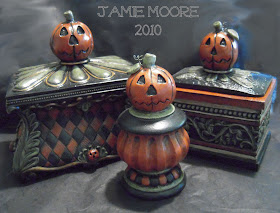
First my collection of Jamie Moore originals J. You might remember me showing the small one up front recently, he was part of a swap Jamie and I did. Then I just had to buy the two boxes you see in the back, after discussing it with my husband... we both agreed we HAD TO HAVE THEM AAALLL! We're a little crazy about Halloween like that! Jamie has an amazing checkerboard on auction at Ebay right now, ending really really soon.
Thanks Jamie! I love them!

Here's something I have had for quite some time now and just realized that I never shared (don't worry, I have already slapped my hand J). This amazing white leather set comes from a contest I won on Kat the Hat Lady's blog. I cannot tell you how ecstatic I am that I now own 3 of her hats! And aren't those shoes just precious!
Love them! Thank you Kat!!!!

And yes indeed! My fingers were quick on the draw and I snagged one of Nikki's skeleton bottles :). My first Nikki Rowe mini, it's so well crafted! She was even kind enough to include some extra tidbits that I can't wait to work with! When my kids saw them we all exclaimed together how we didn't know that acorn caps would look so different overseas. They are acorn caps right J?
Thanks so much Nikki, it's everything I hoped!

It's been long ago that I should have shared this one too. I got this great little book from Kaleidoskopic Romance. Kassandra is a doll to work with and she makes great looking dark-themed items, my fave! Sorry I got him a little dusty, but this book has a beautiful velvet cover and that great steampunk-ish thing on the front.
Thanks Kassandra! Love your Etsy shop!

--------------------------------------------

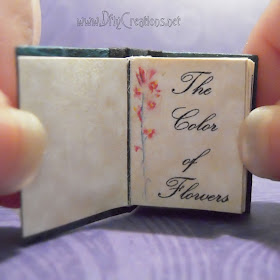
Now we are on to some of my creations. I found a wonderful person on deviantART. Demet is from Turkey and makes really lovely watercolor flowers. Demet also has started making mini flowers (which are equally as lovely!), and dabbles in some other arts. I liked Demet's watercolors so much that I asked if I could make them into a mini book... and here it is.
Can't tell from the picture but this white flower is pearlescent.
There are many more pages with brilliant flowers, please visit Demet's watercolor flower gallery to see them all. This book is currently on it's way to Turkey, hope Demet likes it! If you would like to purchase a book like this, please let me know. Lorraine@DflyCreations.net

Moving on... I made some more pumpkins with faces for an order. I love these guys! I like to think that they are a little different than all the other pumpkins out there right now J.
These little guys are on their way to Italy along with some tombstones and wands. I hear they will be decorating a witch house, hope I get to see it when it's done!

Since we are on the subject of pumpkins, I made my pumpkin wand design into a pumpkin staff for Grimdeva of Cauldron Craft Miniatures & Oddities. It grew from 1 1/4 inches to 3 inches. Looks good to me, what do you think?
Yes, those are my giant sausage fingers! J My daughter wasn't around to let me use her slender hands.

Well that's it for now, off to see about making this follow-along thing and test some paint.